
Recommended Services
Supported Scripts
SMTP Server is a very demanding service at present time. Because every single online business uses email marketing to generate sales and leads to their businesses.
Every online business uses email or SMTP server to send emails in bulk. SMTP server connects customers to other mail servers.
It offers full control, security, and customization for email delivery. Almost all versions of Windows Server come with inbuilt tools to install an SMTP server.
SMTP (Simple Mail Transfer Protocol) service allows you to exchange emails on the Internet. We need to configure our SMTP Server and many other things to do that.
Installing and configuring SMTP servers and relaying them on Windows is not easy. So if you want to learn How To Install an SMTP Server on Windows, this article is for you.
What is an SMTP Server
An SMTP (Simple Mail Transfer Protocol) server is a computer or software that sends, receives, and relays emails. It uses the Simple Mail Transfer Protocol to communicate with other email servers. Here’s a simple breakdown of how it works:
- Sending Emails: The SMTP server sends emails from a client (like an email app) to the recipient’s email server.
- Receiving Emails: It can receive emails from other SMTP servers.
- Relaying Emails: It acts as an intermediary to forward emails from one server to another.
SMTP servers are necessary for the secure delivery of emails on the Internet.
Prerequisites
To avoid issues when installing and configuring an SMTP server on Windows, make sure all requirements are met. Here is a list of what you need to do for a smooth installation.
- Windows Server (2016-2022)
- Internet Information Services (IIS) with SMTP Server
- Domain Name or Static IP Address for the Host
- Valid SSL/TLS Certificate
- An Administrator User Account
Install SMTP Server on Windows
To Install the SMTP Server on Windows without any error, follow these steps.
Step – 1.)
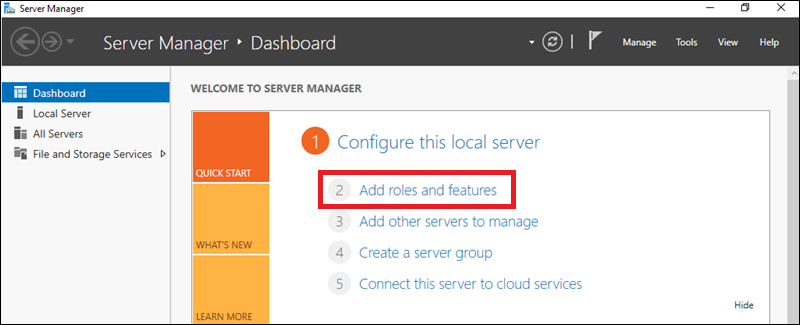
First, open Server Manager on Windows and open Dashboard in Server Manager Console. To open Server Manager, you can type “Server Manager” in the Windows search bar.
Step – 2.)
Now, Add Roles and Features on the dashboard. The wizard will launch in a new window. Now click “Next” to continue.
Step – 3.)
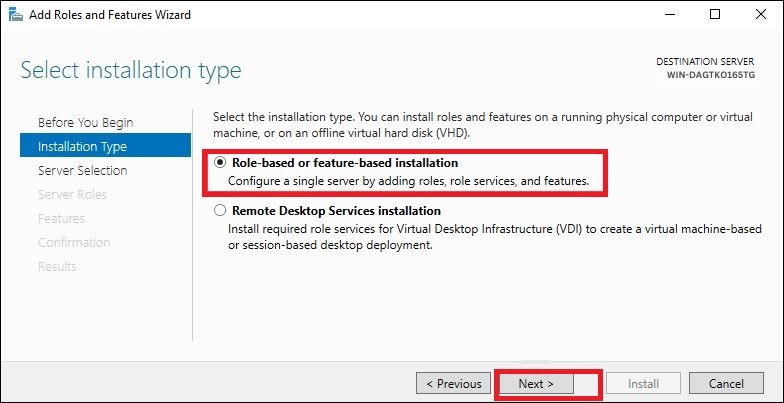
Now, we have to select the Installation Type. We have two options, Role-based or feature-based installation and Remote Desktop Service Installation. Select the first option “Role-based or feature-based installation” and click on Next.
Step – 4.)
Pick a server from the list. To do this:
- Choose “Select a server from the server pool.”
- Look at the list of servers.
- Pick the one you want.

This list shows the servers you added before. You did this using “Add Server” in Server Manager.
If you don’t choose, the local server is picked automatically.
Step – 5.)
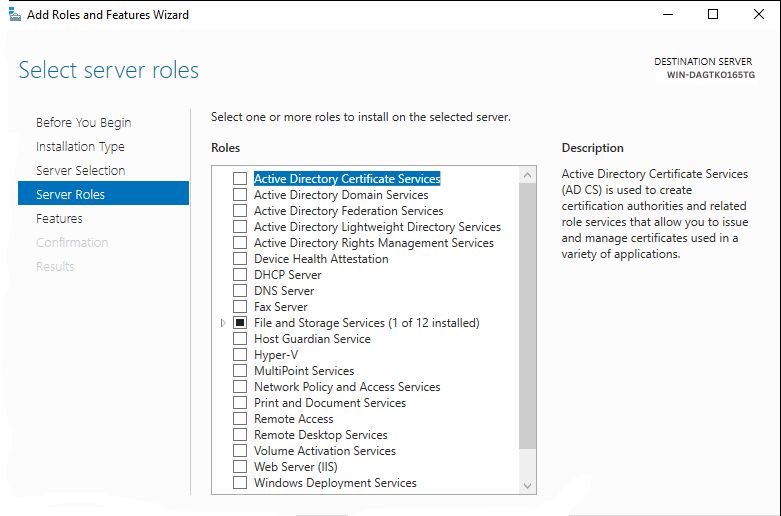
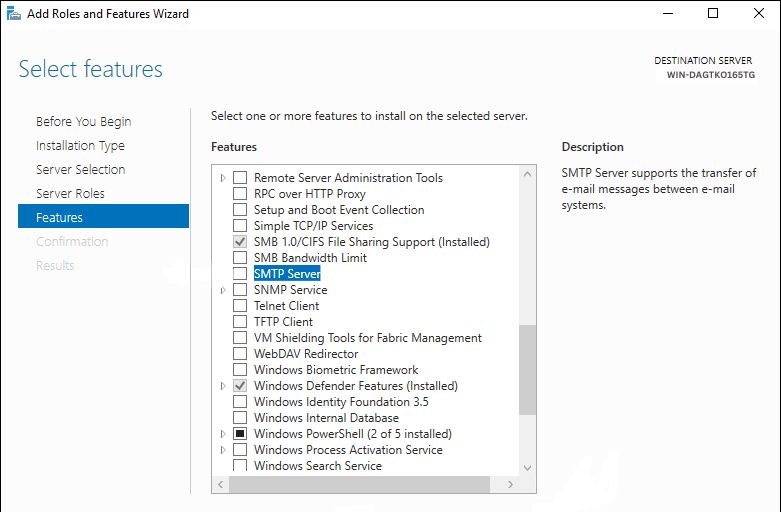
Keep clicking “Next” until you see a page called “Select Server Roles.” Look down the list until you find “SMTP Server.” Put a checkmark next to it. Then click “Next” again.
Step – 6.)
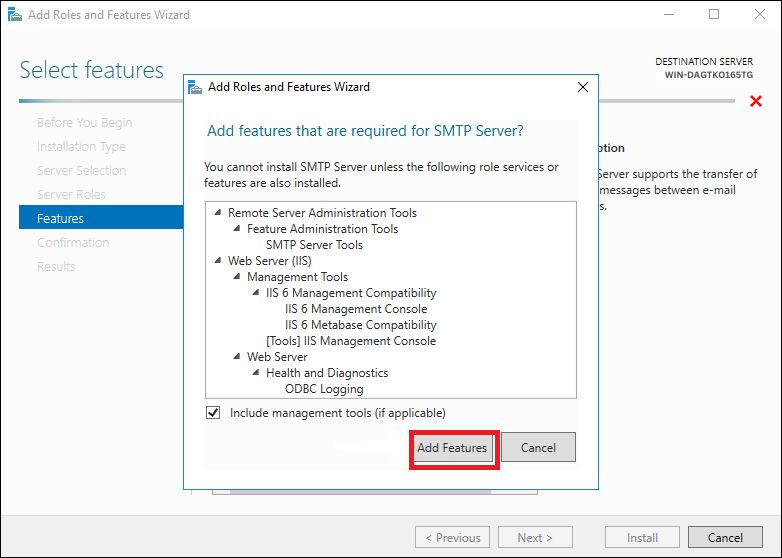
You’ll see a message in a new window. It says more things will be added. To continue, click “Add Features.” Then click “Next” to move on.
Step – 7.)
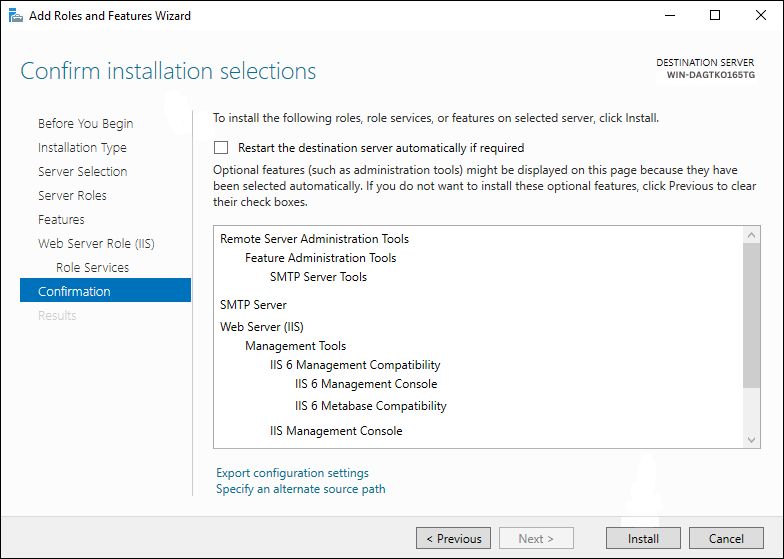
Keep clicking on “Next” until you see a screen that says “Confirm installation options.” The wizard shows you a window listing everything you’re about to set up. When you’re ready, just click the “Install” button. That’s it – you’re all set to go!
Step – 8.)
Now installation is started. It might take a while, so be patient. When it’s done, just click the “Close” button.
Configure SMTP Server on Windows
After installation, we need to configure SMTP Server.
Step – 1.)
First, open the IIS (Internet Information Services) from the Server Manager dashboard.
Step – 2.)
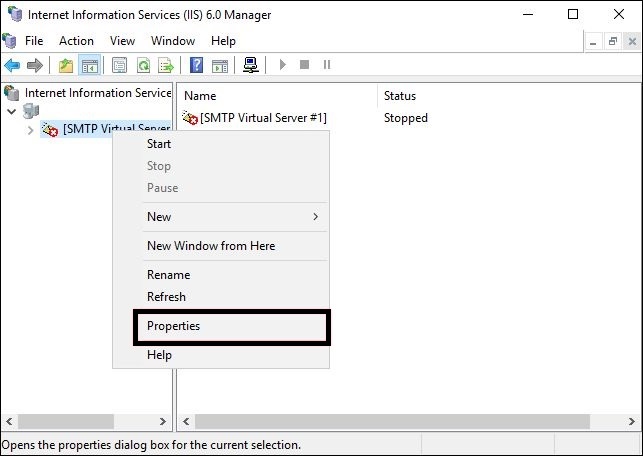
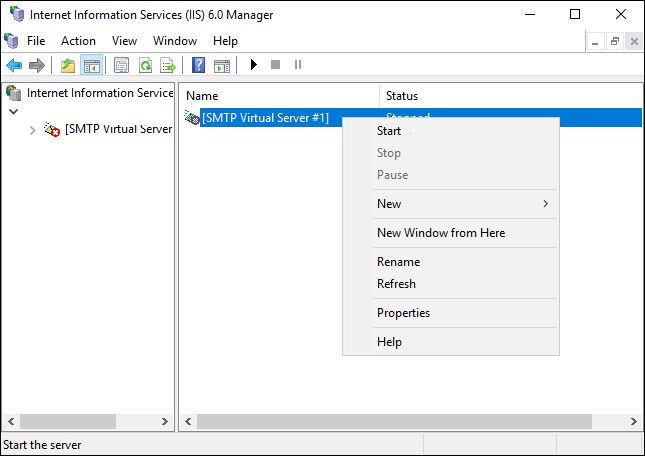
In IIS Manager, you’ll see “SMTP Virtual Server #1”. Right-click on that server name. A menu will pop up. Pick “Properties” from this menu.
Now, you’ll see more options under the server name. Right-click it again and choose “Properties” one more time.
Step – 3.)
Now we have to configure the relay option. To set up email relaying through the SMTP server:
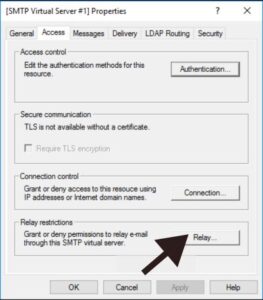
- Open the properties and go to the Access tab. Click on the Relay button.
- Click the “Add” button to choose which computer can send emails through the SMTP server.
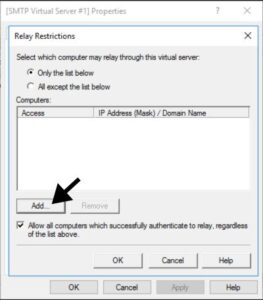
For a single computer, select the Single Computer option. Enter 127.0.0.1 to allow the local computer to send emails. You can also choose a group of computers by selecting the Group of Computers option.

Step – 4.)
The Delivery tab in [SMTP Virtual Server #1] properties has settings for retrying to send emails and security options.
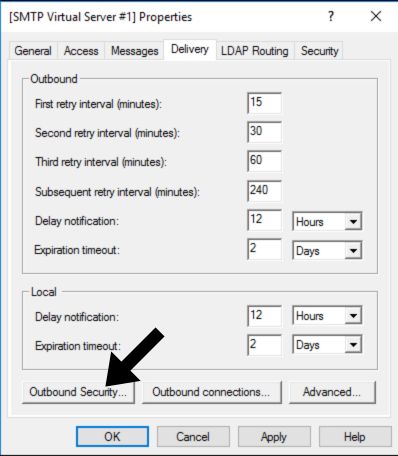
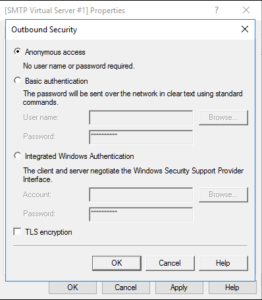
Click on Outbound Security to set up security options. A window will pop up with four security choices:
- Anonymous Access: No account name or password is needed.
- Basic authentication: Used for personal or exchange accounts. The account name and password are sent as clear text. Use TLS encryption for safety.
- Integrated Windows Authentication: Uses Windows domain account and password.
- TLS encryption: Secures the connection with TLS. Requires a valid SSL certificate.
Step – 5.)
Now it’s time to start the SMTP Server. Right-click on SMTP Virtual Server #1 and start it.
Test and Troubleshoot SMTP Server
Once the SMTP server is set up, you need to test it. Here’s how you can test and troubleshoot the SMTP server:
- Check the SMTP server by sending a test email.
- One way to do this is by using telnet.
Follow these steps:
1.) Press the Windows Key and open the PowerShell application.
2.) Open PowerShell as Administrator and type the following command:
Telnet localhost 25.3.) Start the communication with the server by running:
EHLO server4.) Write the email address you will use to send the email. Use this syntax:
MAIL FROM: [email protected]5.) Type the recipient’s email address. Follow this syntax:
RCPT TO: [email protected]6.) Let the SMTP Server know you are ready to send the email by typing:
DATA7.) Enter the email subject:
Subject: Test Message8.) Press Enter two times to go to the main part of the email. Write your message in the space below. Press Enter again when you are done.
9.) To send the email, just type a period (.) and hit Enter.
Check the logs of the SMTP server for any errors or alerts. Look for connection failures and failed login attempts. Also, note any other important error messages.
Make sure to review the SMTP server settings carefully like email domains, encryption types, relay rules, and login settings. Ensure that all configurations are correct and match across different parts or applications.
To confirm that the SMTP server working well, send test emails from different networks or locations. This will help you check if the server is available and running well.
Conclusion
If you want to install and configure an SMTP Server on Windows you need careful planning.
You can easily set up a reliable and secure email system for your business by following the right steps.
After configuring the SMTP Server, You must test and troubleshoot the email setup to ensure email delivery without errors. In this article, we taught how you can install and configure an SMTP server on Windows.
An SMTP server allows you to exchange emails using the MTA. So it is a great option if you want to run your mail server.
FAQs
How to install an SMTP server on Windows 2022?
- Open Server Manager and click on Add Roles and Features
- Select the Installation Type
- Choose server destination
- Select Server Roles
- Add Features
- Confirm the installation and proceed.
What are the benefits of using Windows SMTP Server?
Windows Server has an email-sending system. It’s part of IIS and doesn’t need extra software. You can control it easily from one place. It works with PowerShell to do things automatically. It can send emails for other programs, keep messages private, and make sure only the right people can use it. Setting it up is pretty straightforward.
How to enable SMTP relay in Windows Server?
- First, open the IIS Manager. This is a tool to control your web server.
- Look for the SMTP Virtual Server option. SMTP helps send emails.
- Set up a smart host. This is like choosing where to send your mail.
- Next, go to the Access tab. Here, you can pick which computers can use your server to send emails.
- If you need to make things safer, you might need to add some special certificates. These are digital keys that keep your server secure.
What are some common SMTP issues and what are their solutions?
Email-sending problems are common. Here are some usual issues:
- The email system takes too long to connect.
- Different parts of the system don’t talk to each other well.
- There are problems with making the connection safe.
- The system doesn’t recognize who you are.
- You’re not allowed to send emails.
To fix these, you can:
- Check if anything is blocking the connection.
- Make sure you have permission to send emails.
- Look at the safety certificates.
- Check if all parts of the system are using the same language.
These steps can help get your emails moving again.
How to validate SMTP configuration?
Let’s check if our email system is working right. We’ll do a few easy tests:
- Use telnet to connect to the email server. This lets us talk directly to it.
- Send some test emails. We’ll write simple headers (like To: and From:) and a short message.
- Look in the “pickup” folder. This is where new emails wait to be sent out.
- Check the logs.
- Make sure emails are getting delivered outside our system.
These steps help us to see that everything is working. It’s like giving our email setup a quick health check!